2022-04-11 @equalsraf
From time to time one has to bootstrap some Linux infrastructure from a reduced starting point, and it is worth having a look at all the little steps to get there.
Recently I spent some time thinking about bootstraping Linux systems. This may or may not be easy depending where you are starting from and what kind of systems do you want to build.
The goal is not to build your own Linux distribution from source, but to bootstrap the necessary infrastructure so you can build Linux based software. In order to do that you may need a physical machine, or a virtual one, or maybe a container is enough.
First some assumptions to get us started:
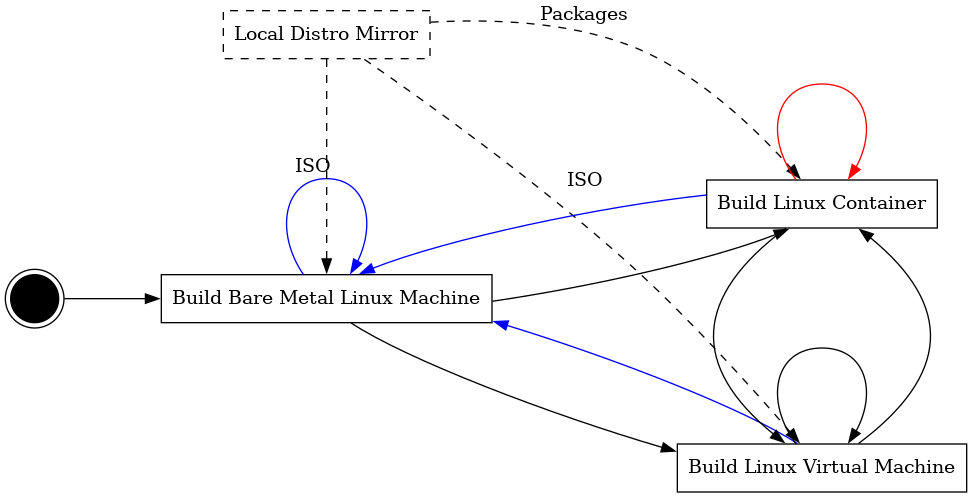
The typical process to bootstrap yourself looks like Figure 1 (dashed lines represent dependencies).
In theory you could pick the starting point you prefer to get to a working container, but I will take the long route, because I will start by assuming that
Later I will relax these, but with them in place we can have a look at the big picture (Figure 1).
Our starting point is that we have some Linux machine or at least we can install one from a local source (DVDs work too). Sadly we cannot avoid the manual labour here, put the DVD in the drive and follow the installation process.
Once your are done, install packages for virtualization such as kvm, libvirt or virtualbox, these will allow you to run VMs later. You will also need a couple of tools such as mkisofs or 7z.
Now that this machine is installed we will build VMs. While there are a couple of ways to go about this I will build installable ISOs for automated VM installation. We will use an already existing ISO which can usually be found in any distribution mirror.
The process is straightforward:
First we need to create these two files:
With these you can control the boot process of your ISO as well as the result of the installation of the ISO. This allows you to automate the entire process of installing the system in a VM.
My autoinst.xml just uses a single partition, adds the oss and update repos, enables some services, and sets an ssh key for root (the default policy in suse prevents root from using passwords).
autoinst.xmlThe isolinux.cfg I am using is a modified version of the openSUSE default file, my only changes are the additions of:
These are described in the linuxrc docs and are passed by the boot loader to the kernel which then passes them to init and linuxrc:
default linux
serial 0 115200

label linux
  kernel linux
  append initrd=initrd splash=silent showopts console=tty0 console=ttyS0,115200 linemode=1 autoyast=cd:/autoinst.xml install=cd:/ ifcfg=*=dhcp  sshd=1 password=password

implicit	1
prompt		1
timeout		1
No special permissions are required to rebuild an ISO file. Here is a script to build a new image from a Tumbleweed ISO.
readonly ISO=$(realpath $1)
readonly VOLUME=$(isoinfo -d -i ${ISO} | sed -n 's/Volume id: //p')
readonly OUT=$PWD/build/system.iso
readonly WORKDIR=$PWD/build/iso
readonly SRC=/$PWD

rm -rf ${WORKDIR} || true
mkdir -p ${WORKDIR}
cd ${WORKDIR}
7z x ${ISO}

cp $SRC/isolinux.cfg $WORKDIR/boot/x86_64/loader/
cp $SRC/autoinst.xml $WORKDIR/

rm -f ${OUT} || true
mkisofs -o ${OUT} --input-charset utf-8 -b boot/x86_64/loader/isolinux.bin -c boot.cat --no-emul-boot --boot-load-size 4 --boot-info-table -J -R -V "${VOLUME}" ${WORKDIR}
NOTE: your isolinux file might not be so simple and you may have to generate from templates, or pass more options to mkisofs. One example is CentOS where the ISO label must match the config files.
To run your installation you use qemu in your system. Remember to assign at least 1G of RAM as the yast installer will not start with less. Once the script terminates the mydisk.raw disk image holds the installed system.
qemu-img create build/mydisk.raw 4G
qemu-system-x86_64 -no-reboot -enable-kvm -boot d -cdrom build/system.iso -m 1024 -nic user,hostfwd=tcp::10022-:22 -hda build/mydisk.raw -nographic
NOTE: another way to do this is using virt-install which does something similar in a system with libvirt.
And that is it, you can now boot your new system with:
qemu-system-x86_64 -enable-kvm -boot c -m 1024 -hda build/mydisk.raw -nographic -nic user,hostfwd=tcp::10022-:22
The added hostfwd option is meant to allow me to access the VM from the host so I can automate other work. In a libvirt setup you can get the VM dynamic IP from virsh and connect over the bridge.
Now that we have a VM we can do pretty much whatever we want inside, so lets build a container.
There are plenty of container tools in Linux, Docker being the most well known. But for this example I will use buildah.
My preference for buildah is because it enables regular users to run containers without a daemon or special privileges (other than subuid/gid settings for your user). Furthermore, users in these containers can appear to be root (uid 0) with file permissions being mapped to a different uid/gid outside the container. This means these container can be reused to build anything that requires root.
The tool behind buildah that creates these containers is actually runc, buildah hides some of the neat details behind each runc setting.
For this description I will assume the running user has no root privileges or sudo, but he has a working buildah.
For starters let us assume we have nothing - not a single file in our container. But we can't bootstrap a Linux system out of thin air unless we are compiling from source. What we can do is call the tools in our host system to install packages in a separate root filesystem.
In openSUSE the zypper package installer supports this via the *--root* option, but it does require root permissions to run, because package files expect to be created with certain permissions.
However this is where buildah can help us. Without going into details - the (buildah unshare) command allows you to run a container of sorts, where the filesystem is the same as your host filesystem, but the running user appears to be root even if this is started by your regular user. This is enough to fool zypper and other tools, provided you don't actually try to write files your user cannot write in your host.
So if I were to execute something like this:
buildah unshare ./buildcontainer.sh
The buildcontainer.sh script could execute commands as if it were root (minus the actual root permissions). So the following is a script that could bootstrap a container root filesystem
readonly CONTAINER=$(buildah from scratch)
readonly MOUNT=$(buildah mount $CONTAINER)
readonly OPTS="--root $MOUNT --gpg-auto-import --non-interactive"

zypper $OPTS ar http://download.opensuse.org/tumbleweed/repo/oss/ oss
zypper $OPTS ar http://download.opensuse.org/update/tumbleweed/
zypper $OPTS ref
zypper $OPTS install -y openSUSE-release-appliance-docker
buildah commit --rm --squash $CONTAINER myimage
First the buildah commands create an empty container (scratch) and mount its root so we can access its files. Second the zypper commands are a standard way to install a new rootfs in a different path. And finally the container is destroyed, but saved as an image we can reuse for other containers.
Outside of the unshare container, you list the image you created with the "buildah images" command, or export it to a tarball with the buildah push command. The "buildah from" command can create new containers from images, and "buildah run" will run the containers. Finally "buildah config" command which can set settings for a container, such as its environment or working directory.
Now we can think about what we did so far, and can be improved or changed. Once you realize that you can bypass some steps our original drawing turns into something like Figure 2.

Maybe, if you only need containers and whatever system you are using has a working buildah install for your user. There are scenarios where what you really want is a VM, rather than a container.
This is usually what happens when you are building on top of managed infrastructure and have no dependency on hardware - i.e. you are 100% cloud based.
If your starting point is a Debian/Ubuntu system do not worry. There are packages in Debian for Zypper (openSUSE) and Yum (Fedora/RHEL) as well as buildah. Based on these you should be able to build your VM or Container for those distribution even if you are starting from a Debian machine. However the requirement for additional permissions remains, and that is why you need buildah.
NOTE: Debian's rpm is patched and used to write to /root/.rpmdb instead of the rootfs.
There a few obvious arrows missing from the plan in Figure 2 to make a full mesh, which I highlighted in color. If you want to automatically:
These are useful if you want to automate this whole process. The process of building a container within a container should be very similar to building a regular container.
Building bare metal machines is usually more complicated and requires a working PXE DHCP setup in your network. But once that works it should be similar to the process for the VM - it boots a CD with autoyast and performs automated installation - the main difference is that it cannot auto poweroff at the end.
This takes us through a couple of tools to bootstrap some infrastructure from scratch. Even if you don't care about all possible combinations, I think it is useful to show the full picture, after all most of our problems are solved by adding one more indirection (i.e. one more VM or bare metal).
I did some variation of this a few times for $DAYJOB. You tend to do it over and over once some key component in your infrastructure changes enough.
One aspect I have not touched on is how this relates to CI and deployment infrastructure, but that is probably an article on its own. All these VMs or containers need to be stored somewhere and deployed at some point. But I will leave that for another time.